The Backyard Studio Project.
This is the story of how my backyard studio project began, evolved & continues to change as more ideas come to me. Hopefully it will give a few tips & pointers if you want to do something similar. It began a little half heartedly when we first moved into our new house last year but I revisited it in earnest in February 2016 as an answer to my need to find an outlet for my photography after a redundancy & change of job cut my photography time & access to my favourite area for wildlife drastically.
Although I enjoy exploring most aspects of photography I love wildlife & especially bird photography. I had begun the previous year with a small patch, probably around 2m square which I then added a bird table, feeding station & some plants known to be attractive to birds, Lavender & Clematis to attract insects, pyracantha for it's berries & dogwood for cover. All of the info for this I got from the RSPB website, as well as suggestions for the best feeds to use to attract different birds, which although useful is not definitive as I've found that the birds don't strictly stick to the rules of what they should or shouldn't eat. That's where your own observations & experiments will be essential. What works for one feeding area might not necessarily work for the other. I had some success attracting pigeons, sparrows etc but to be honest I didn't like the look of the images of birds on feeders or tables so I left the patch as just a feeding area & concentrated more on my outdoors photography.
Fast forward a year or so & I was made redundant from my job. That wasn't really a problem as I found a job at a local special needs school. It's a great job, very fulfilling & nice to feel I'm helping the school that did so much for us & our kids (we have twins with disabilities). Only downside, apart from only being temp until summer was that with the hours I worked & the care we have to give our twins & other son I had lost my access to the local marshes which I used to visit on my way to & from my previous job.
I had to do something to keep my photography going within the constraints I had so I began to look at the garden again & ways I could use the feeding area a little more creatively. It began slowly, moving a few things around, adding some small logs & tree offcuts for the more natural look but keeping the main feeding station & bird table to attract the birds in. I struggled with the idea of baiting these “natural” areas for a long time as I had always preferred to go out & find my subjects rather than make them come to me, it sort of felt like cheating a little bit. In the end I decided to go with the feeding as I figured at the end of the day all I was doing was providing the birds with a more natural looking feeding environment. To achieve this I drilled out or cut sections into the logs which could hold various foodstuffs. It's personal preference but to keep the natural look all of these holes or sections were placed where they would not show up much on camera. It's also important not to use your foot to steady the log you are drilling into unless you want a bloody toe..
I kept an observation of these areas for activity routines & bird types to get an idea of what to expect & when, as well as what food types worked best for what bird. When I was satisfied I had at least a rough idea I set up the chair hide which had been sitting unused in the shed for the last 6 months. I don't like hides when I'm out shooting, a throw over is fine but unfortunately I'm too impatient a person to sit in a hide for hours, always feel like I'm missing something round the corner. Seeing as I wouldn't be going anywhere I thought I'd give it a try. Turned out to be a massive failure, although I'd left it out for over a week for the birds to get comfortable with it It just seemed that every time I went in it the birds were a no show. It seemed to me that it was a combination of my presence & also the times I had available weren't exactly peak feeding periods. From observation I noted that the peak feeds were at times when there was no way I would be able to get out, in the morning when I would be feeding & dealing with getting the twins ready for school & evening time when they got back from school. The rest of the day I would be at work so this presented me with a little problem. I wasn't about to give up though, I just needed to find a workaround.
I explored the option of using Magic Lantern. I had installed the Magic Lantern firmware previously on my Canon 550d & 5dmk3 but had only really used it for the intravolunter timer & focus stacking. Looking at the options I realised it could trigger the shutter by motion detection or trap focus. This gave me the idea to site the camouflaged camera focused on the area I wanted & leave it to capture the images. This worked to a degree, the birds did not seem bothered by the camera & it did capture some images but there were some big limitations. Motion detection was hit & miss & did not work on the 5dmk3 at all, after much frustration & thinking I had set it incorrectly I discovered via the internet that there was a bug on the 5dmk3 firmware & motion detect was a no go. Even using the 550d I found the results lacking in consistency, sometimes it would fire, others not. I then took to using the trap focus feature with more success. With the trap focus I was able to set a single focus point that would trigger the shutter if a subject entered the focus plane at that point. To do this I would place an object on the area I wanted to capture, focus on it then switch the lens to manual focus & remove the object. It was more consistent with the triggering & I do still use it occasionally now but I still wasn't happy with the fact I had no control over when the shutter fired & felt there must be a better way. I am curious to site a camera trap in the wild to see what I can get but that will be for a little later in the year.
I dug out some old wireless flash triggers (yongnuo RF-603c's)I had bought a while ago, half remembering something about them being able to double as a remote trigger. With these I was able to put the camera pretty much anywhere I wanted in the garden/conservatory/shed etc & still remotely trigger the shutter. This was a much better approach for me, I could keep an eye on what was going on between dealing with the kids & have more control over the shots. But I still wasn't happy. I didn't like the backgrounds on a lot of the shots, it didn't do the birds justice & they just seemed to blend in. They were ok photographs but I'm always trying to find something a bit different to keep me interested & these just didn't spark my interest.
I'd had a brief interest in using off camera flash for some portraits I did a few months ago so I already had a yongnuo YN622c controller & receivers as well as a couple of yongnuo flashes with ttl & a very basic godox one with slave function. I thought about the idea of using flash with the bird so I did a bit of research in the matter, mainly to see if it would have an adverse effect on them, last thing I wanted was to cause harm to them after inviting them into the garden. After a lot of research the results seemed inconclusive, however a lot of sources claimed that low level flash would be unlikely to cause harm unless it was a nocturnal species. While doing this research I came across some photo's by Ray Hennessy who's images & use of flash intrigued me & gave me a direction to head in.
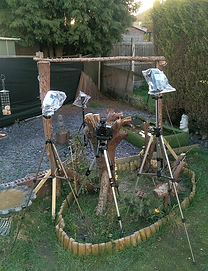
I began with a two flash setup on one of the small logs with both flashes at about 45 degrees from the log to give an even light. I started with the flashes on extremely low & worked up the power while observing the birds reactions. Initially they were startled by the flash but soon returned to feeding & over the next few days I kept experimenting with flash power. It seemed that the Starlings didn't seem bothered at all once they got used to it so they became my main subjects & I began to get more of the look I wanted with the images. It still wasn't quite what I was after so I bought in the slave flash to the rear to give some backlighting, unfortunately this didn't fire consistently no matter where I placed it so I ended up buying another receiver to go with the YN622 & it worked fine after that. I now had a 3 flash setup which I could control 2 of from the camera & began to look at angles & ideas.
While I was playing around with these ideas I had improved the feeding area. I swapped out the bird table for a large tree stump which when upturned would give lots of nooks & crannys for the birds to hunt for food in & give a much more natural look. This was drilled & cut with feed areas. I also built a small reflecting pool by using a 2x1m piece of ply which I then screwed 6 inch pieces of timber around the sides to make a rectangular pool shape. This was then lined with heavy duty black polythene (apparently black is best for the reflections) & I built up a small incline at the far end from slate I had in the garden to give the birds a bathing/drinking area. I finished it off by covering it with artificial grass to blend it into the garden a bit as I had sold the idea to my wife as a water feature.... At present I haven't used this much for photography but a large water source is always good for attracting birds to the garden. On the subject of attracting I have found over the last year the most consistent foodstuffs to be mealworms, suet logs which you can mould & stick in the logs & sunflower hearts, but as I've said earlier that doesn't mean this will work elsewhere.
It was all starting to take shape now, I'd got the camera/flash settings about right (1/200th on the 5dmk3 or 1/250th on the 7dmk2, between 50-200 ISO & f14-120 & flash at between 1/16-1/4 power) & the area was getting a lot of air traffic, mainly from Starlings but other species were starting to investigate. The background still bothered me as I was having to spend editing time getting rid of unsightly reflections so I stapled some black capillary matting to the fence & that solved the problem. I started to get some images that I really liked & I felt were a little different from the “normal” wildlife shots. The final addition was a large perch above the area which gave the birds an area to congregate & meant I could have a more predictable way to catch the birds in flight.
Now it is all set up as I want it (for the time being at least) I have been playing around with different ideas with the lighting, camera placement & angles. For the most part the birds are fairly nonchalant about new additions now, I've even had the camera centimetres away from them with a wide angle lens & they have accepted it which gave an interesting viewpoint. Covering the flash units with clear ziplock bags gives the opportunity to shoot in the rain & that gives an interesting almost starlight look.
As I said at the start, it's still evolving & changing but it gives me something to do between my trips out for “real” wildlife as well as ideas I could possibly use in the field.
Below is a list of equipment I have used
Canon 5dmk3, Canon 7dmk2, Canon 16-35mm lens, Canon 400mm lens, Sigma 150-600mm lens, Yongnuo YN62c flash trigger & 3x recievers, Yongnuo RF-603c remote triggers, 2x Yongnuo 568ex flash units, 1 x godox basic flash, 3 x charity shop tripods for flashes, 1 x vanguard tripod for camera.